

Learn how to best organize your Dolby Atmos session to optimize your workflow and create more efficiently.
In the past, we’ve shared some Session Organization Tips for Pro Tools, including how to lay out your dialogue, music, and sound effects tracks; manage stems and predubs; and navigate large track counts efficiently. Now, with more and more sound designers, editors, and mixers starting to work in Dolby Atmos, we decided to revisit the topic. This guide will not focus on any specific DAW, but you should be able to easily adapt these tips to your software of choice.
Because Atmos works fundamentally differently from traditional surround formats, working in the format requires a different workflow – and that extends to your session organization, as well. Whether you’re a sound editor, mixer, or a one-person sound department, it’s important to understand how Atmos works so you can use it effectively.
The number one difference between Atmos and traditional surround is the use of Audio Objects instead of channel-based panning. Audio Objects combine audio tracks with metadata for spatial positioning, panning, and other parameters, which is computed by the Dolby Atmos Renderer to reproduce a mix accurately on almost any speaker configuration without the need for remixing, upmixing, or fold-downs. This allows mixers to focus on creating a great mix that will sound dynamic and immersive in any environment, from cinemas to headphones.
While Object-based audio provides endless possibilities for immersive sound design and mixing, it also presents a few hitches when it comes to organizing your sessions. Normally, a DAW session for film or TV will contain a nested hierarchy of busses, allowing mixers to easily bounce anything from a full print master to stems, predubs, and more. But in Atmos, all Objects and Beds are routed straight to the Renderer, meaning you’ll have to take a different approach to structuring your sessions. We’ll start by introducing the concept of Beds, as they function similarly to traditional channel-based stems.
Bed Tracks
In Dolby Atmos, Beds are special tracks made up of linked Objects representing virtual speaker configurations ranging from 2.0 to 7.1.2. Beds serve several functions, including allowing you to use surround tracks inside of spatial mixes, create stems and submixes of non-Object tracks, utilize 3D reverbs, and more. However, because they are limited to 7.1.2, Beds do not provide as much spatial resolution as individual Objects. Here are some of the most common uses for beds:
Beds as (Partial) Stems
First, we recommend that you set up three 7.1.2 bed tracks to represent the main elements of your mix: dialogue, music, and sound effects (feel free to add additional sub-stems if needed, such as backgrounds or narration). Any surround or spatial tracks should be routed to these beds, such as Ambisonic ambiences or 5.1 music mixes.
You can also mix in any mono or stereo sources that do not require the full spatialization of an Object, such as stereo music tracks or dialogue that stays in the center. This will save Objects for more important tracks that benefit from point-source spatialization.
However, keep in mind that these “stem Beds” do not represent entire stems – you will need to link them with their associated object tracks using Object Groups (more on that later).
Examples of beds used as partial stems:
1.
- Sound Effects Bed (7.1.2)
- SFX Reverb Bus (7.1.2)
- SFX Reverb 1 (7.1.2)
- SFX Reverb 2 (7.1.2)
- SFX Reverb 3 (stereo)
- SFX Bus (7.1.2)
- Foley Bus (7.1.2)
- Backgrounds Bus (7.1.2)
- SFX Reverb Bus (7.1.2)
- Sound Effects Objects 1-32
2.
- Dialogue Bed (7.1.2)
- Dialogue Reverb bus (7.1.2)
- DX Reverb 1 (7.1.2)
- DX Reverb 2 (7.1.2)
- DX Reverb 3 (stereo)
- Dialogue Bus (7.1.2)
- Screen dialogue (LCR)
- Walla 1 (Ambisonic)
- Walla 2 (5.1)
- Dialogue Reverb bus (7.1.2)
- Dialogue Objects 1-16
Beds for Backgrounds
Backgrounds are a natural use case for Beds, since they typically contain layers of surround, stereo, and mono sources but don’t always require pinpoint spatialization. In fact, because background elements are typically not meant to stand out and draw attention, you may not need to use any Objects at all for your backgrounds.
However, the line between backgrounds and hard effects can be blurry, and everyone has their own idea of what fits in each category. For example, if you’re designing the ambience of a futuristic spaceport, you might combine spatial and surround background and walla recordings with mono spot effects such as utility vehicles passing by. But, if you want to feature a big spaceship passby as it lands off-camera, you’re better off using a dedicated sound effects Object instead.
Example of a backgrounds Bed layout:
- Backgrounds Bed (7.1.2)
- BG Reverb 1 (7.1.2)
- BG Reverb 2 (7.1.2)
- BG 1 (Ambisonic)
- BG 2 (5.1)
- BG 3 (stereo)
- BG 4-8 (mono spot effects)
Beds for Reverb
To add a spatial reverb in your Atmos session, first create a 7.1.2 effect track loaded with your reverb of choice and set up sends from all relevant channels. Just like in a traditional channel-based mix, it’s best to use discrete reverbs for each stem so you can deliver stem-based renders with only the sounds you want in the reverb.
For sound effects and dialogue, we recommend at least two convolution reverbs to handle overlapping sections, plus one or more “effect” reverbs with delay or modulation. Depending on your needs, you can route all of the reverbs for each stem to their associated Beds or create dedicated reverb Beds if you want to be able to isolate the reverb at the stem level.
"Beds serve several functions, including allowing you to use surround tracks inside of spatial mixes, create stems and submixes of non-Object tracks, utilize 3D reverbs, and more."
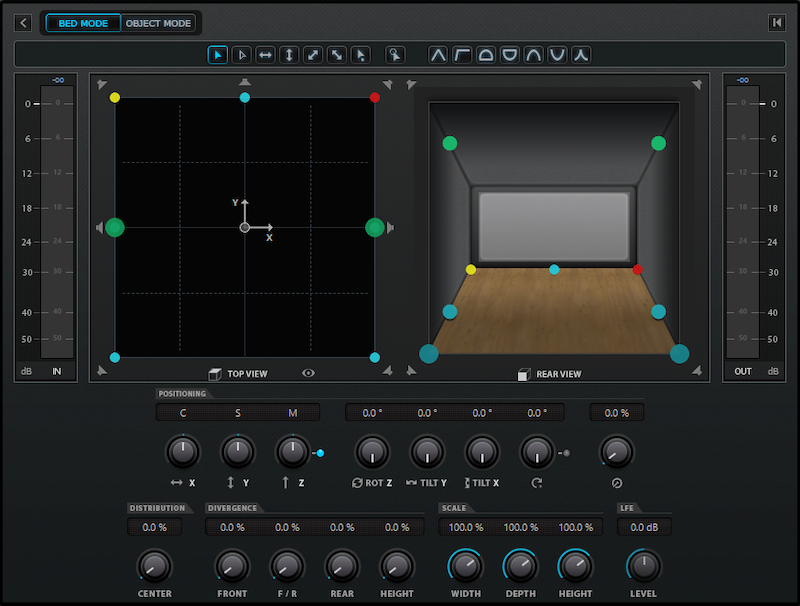
The Dolby Atmos panner in Bed mode.
Object Tracks
Object tracks allow you to freely move mono and stereo sources around the soundfield, so they should be used anytime you need to freely position a sound. But because Objects are limited, we recommend using only as many as you need to handle the maximum amount of simultaneous sound effects or dialogue tracks. If you have some to spare, you can create dedicated Objects for certain recurring sound effects, such as a superhero’s signature power or a prop that appears frequently throughout the film.
Just like in a typical editing session, it’s a good idea to divide your Objects into a few main categories for easy organization. For example, sound effects Objects 1-8 can be used for common effects like doors and vehicles, 9-16 for Foley, and 17-24 for sound design elements. However, in an extremely busy mix, you may need to share Objects between categories, so it might be best to simply label them as Sound Effects, Dialogue, and Music Objects.
Keep in mind that because Objects are routed straight to the renderer and not through a stem bus, you won’t have a chance to apply a limiter across an entire stem. Therefore, it’s a good idea to load a limiter on each object, as well as any other frequently used plugins such as EQ, distortion, and multiband compression.
Object Submixes
While Dolby Atmos provides 128 objects to work with, each Bed occupies anywhere from two to 10 of them, leaving a limited amount to use as true objects. And because stereo Object tracks require two Objects each, it becomes extremely important to manage Objects effectively. To use all available Objects as efficiently as possible, it’s best to create a submix of mono or stereo tracks for each one. This will allow you to easily layer sounds and pan them all at once with a single Object. For sound effects Objects, your submix might contain tracks for low, mid, and high-frequency layers, while a Foley object might contain all of the footsteps and movement for a single character as they walk across the frame.
Example of an Object submix:
SFX Object 1 (stereo)
- SFX Obj 1 Submix (folder)
- SFX Obj 1.1 (stereo)
- SFX Obj 1.2 (mono)
- SFX Obj 1.3 (mono)
Music Objects
Although scores are often delivered as stem tracks and mixed into a bed, you might encounter situations where it’s useful to have a few objects free to provide more control over certain music tracks. And, as more and more composers start working natively in Atmos, you may even receive a complete ADM for the score, which you will need to integrate into your Atmos session.
Uses for music Objects might include scenes with instruments being played on-screen, big moments in the score where you want certain instruments to cut through the mix, or any time you need to pan a music track with point-source spatialization. When mixing diegetic music such as radios and TVs, Objects can help you convincingly place the source in the scene.
LFE Sends From Objects
Because the Dolby Atmos specification includes a preference for full-range loudspeakers in all positions, there is no LFE send from the panner in Object Mode. Ideally; the front, surround, and overhead speakers in a properly set up theater should all be able to reproduce sounds in the LFE range (and most home theaters utilize bass management), so you shouldn’t need to use the LFE channel most of the time.
However, it is still sometimes useful to send objects directly to the LFE channel as a special effect. To do this, you’ll need to set up one or more dedicated LFE send tracks. First, create as many 5.1 tracks as you need (most likely one per stem) and name them “SFX LFE”, “DX LFE”, “MX LFE”, and so on. Depending on what you need to deliver, you can choose to route these to their respective stem Beds or create discrete LFE beds if necessary.
However, for this workaround to function correctly, you’ll need to make sure that anything you send to these tracks is routed only to the LFE channel, and the setup for this can differ between DAWs. In Nuendo, for example, you’ll need to first send your objects to a mono group track (not an Object or Bed) called “LFE Send”. Then, route that track to the 5.1 LFE track at unity gain. On the 5.1 LFE track, you’ll need to use the MixerDelay plugin to mute all channels except for LFE. This way, when you send from an Object to the LFE send track, the signal will go only to the LFE channel of the Atmos mix.
Assigning Objects to Stems
Because Objects are routed straight to the Renderer and not through Beds, you can’t simply solo a stem track like you would in a traditional surround mix. Instead, you’ll need to link them to their associated Beds using track groups, folders, or VCAs (depending on your DAW). This will enable you to easily solo or mute every Bed and Object in a given stem at once.
"Object tracks allow you to freely move mono and stereo sources around the soundfield, so they should be used anytime you need to freely position a sound."
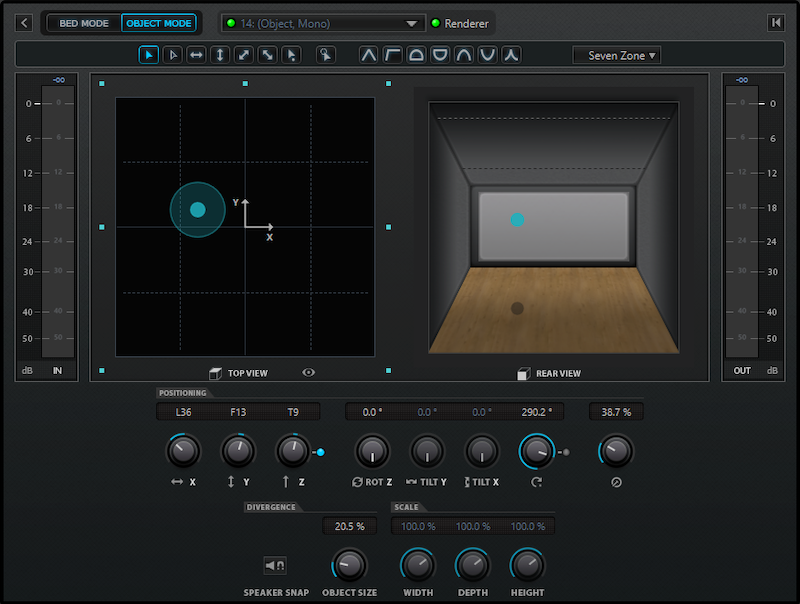
The Dolby Atmos panner in Object mode. Note the missing LFE control.
Object Groups
Although you can’t utilize traditional stem buses in Atmos, you can use Object Groups to combine Beds and Objects into stem-level categories such as Dialogue, Music, and Effects. Then, in the Dolby Atmos Renderer, you can print your stems by selecting which Groups to include or exclude. To assign Groups to your Beds and Objects in the Renderer, click the drop-down menu in the Object Group column for each Bed and Object, and select a Group for each.
The default Groups are Dialogue, Music, Effects, and Narration; but you can easily rename, add, or remove groups with the Object Group Editor under Settings to create your own custom stems. For example, you may find it useful to separate production dialogue and ADR, score and other music, or backgrounds and hard effects.
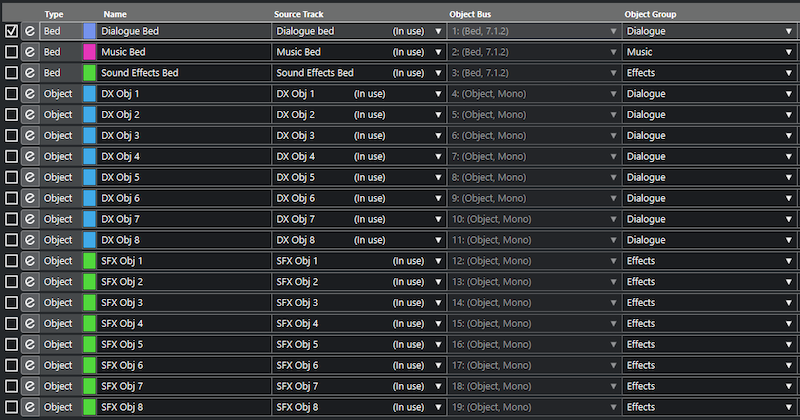
A simplified example of Object Group settings (rightmost column) in Nuendo’s Renderer For Dolby Atmos.
Make it Your Own
Using this guide as a starting point, set up your own Dolby Atmos template for the way you like to work and what you need to deliver. If you’re working with a team, make sure you’re all on the same page about how to set up your Atmos sessions for effective collaboration. Here are a few ideas for customizing your templates:
- Dedicated Beds and Objects for each predub
- Preset panning for commonly used positioning such as overhead ambiences
- A mono dialogue object with the Size parameter at 100% for “voice of god” moments
- Guide tracks for reference audio that aren’t routed to your main mix
If anyone else will be working with your tracks, be sure to name everything in a concise but recognizable way. Spell out words whenever possible or use widely accepted abbreviations such as SFX, MX, DX, BG, and Verb. Refrain from using confusing shorthand names like “Dials” for dialogue or “Atmos” for atmospheres, even if they make sense to you.
Finally, When assigning your Beds and Objects, think about what you want to have control of when it comes to delivering stem-based re-renders. If you know you will only need stems for Dialogue, Music, and Effects, you can simply create one Bed for each. However, you may want to create discrete Beds for different sonic “food groups” such as Foley and backgrounds or separate dialogue and walla to provide flexibility for international localization.
By taking the time to set up your sessions in an organized fashion, you’ll reap the benefits of a faster workflow, organized deliverables, easier session recall, and happier collaborators.

Dante Fumo is a Midwest-based sound designer, editor, and mixer specializing in independent film and Dolby Atmos mixing. In his free time, Dante composes electronic music and publishes Harmonic Content, a zine about sound.