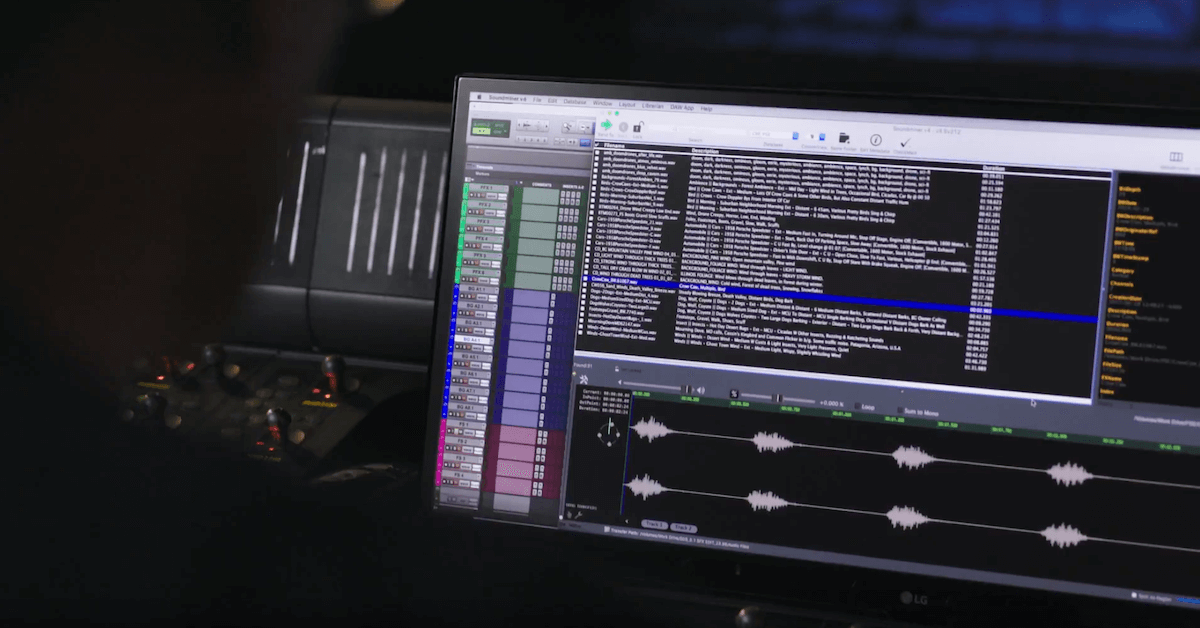
11 detailed tips and tricks for navigating Soundminer V4.5 Pro and HD Plus search software.
If you work in audio post production, you have probably encountered Soundminer search software. The popular audio file management system is a very powerful database search software offering a comprehensive range of tools and options, but not all of them are instantly apparent. The following tips will help you get started with Soundminer.
Even Soundminer veterans might find bits of new information in this article. We know that these quick tricks of the trade may seem basic, but they are nevertheless worth a look - even for power users. It is remarkable how many professionals with years of experience sometimes don’t know the simplest tricks...
(These tricks can be universally applied to both Soundminer V4.5 Pro and Soundminer HD Plus.)
Article by PSE Master Library contributor and recordist Guido Helbling of Avosound – read the original article here.
Table of Contents
- 1. Creating a clearly arranged database structure for sounds, music and noises.
- 1.1 Creating More Databases
- 2. DAW Menu
- 3. ReWire
- 4. Search Lock [cmd L]
- 5. Freelance Mode (only Soundminer V4.5 Pro)
- 6. Shortcuts
- 7. Edit Mode
- 8. Embed Selected Records
- 9. Soundminer Server for Teams
- 10. Renaming Databases
- 11. Transfers explained
1. Creating a clearly arranged database structure for sounds, music and noises.
Soundminer newbies often approach us about this topic. We recommend that you divide your sounds into groups, as in the following example:
- Database 1: all sounds currently in use
- Database 2: all purchased sound archives
- Database 3: all your own sounds
- Database 4: all production music
- Database 5: all special sounds
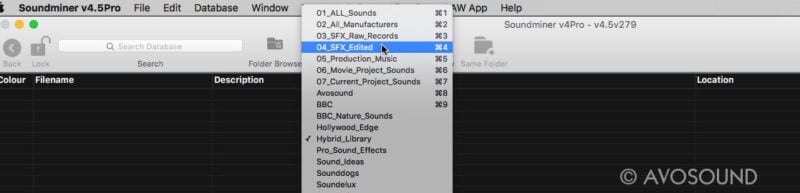
A clear database structure helps keep your archive tidy and effective. Tip: the ⌘1 - ⌘9 shortcut buttons allow you to switch between the first 9 databases on the list.
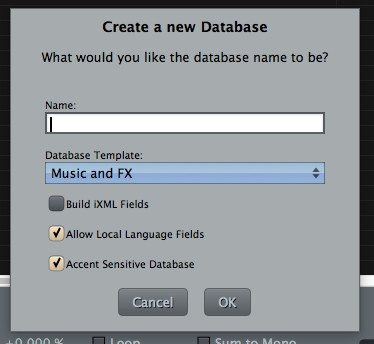
Create a database for each of these categories. We recommend that you use the template 'Music And FX' for the creation of the database. I will explain the reasons for this in more detail later on. In a nutshell: this establishes all available fields for music and sound databases. The reason why we recommend this approach is because it is no longer possible to ‘update' a table later in the process.
For performance reasons, Soundminer only allows you to search for files within a single database, so we make use of a database that contains everything we need for work. Into the first database we therefore put all the sounds that are currently in use. This includes all sounds that you are using for your work, e.g. purchases sound archives, your own sounds, your own sound archive and anything else connected to your work.
A second database is used for all purchased archives and a third one for your own sounds. For the latter, we recommend that you distinguish between raw material and edited/processed material. If you do a lot of recording, it pays to have a separate archive for raw material (with iXML fields). This way your material is clearly arranged and won't get lost (as long as all new recordings are imported and properly labelled, of course).
Furthermore, we recommend that you use separate databases for all music as well as for sounds from other projects.
1.1 Creating More Databases
 It is also very practical to organize sounds in databases according to manufacturer. If you are looking for animal noises, for example, and you know that the BBC Nature Library contains lots of them, you won't have to look in any of the other archives (but you also won't find possible animal noise listings in them either).
It is also recommended to create a few test databases for the sole purpose of importing files quickly and deleting them again after short use.
Ultimately, it is best if you develop your own process (or system) that works for you. At the risk of sounding a bit overbearing, let me just say that a solid, clearly arranged structure will help you keep things neat and efficient.
The goal of all this is simply to speed up your everyday workflow. If you don't like the structure you established, you can always delete the database and create a new one.
2. DAW Menu

The DAW menu in the Soundminer title caption is easily overlooked. The DAW menu displays the applications that are currently open and able to communicate with Soundminer. If you are working with Pro Tools, Soundminer will automatically make the selection. But if you are working with a different software, you should check if your application (including picture editors) is displayed in the DAW menu. If it is, make sure to select it!
If an application is selected in the DAW menu, it automatically becomes Soundminer's target application. Depending on the application, Soundminer allows for direct data transfers.
The interoperability between editing systems like Pro Tools, Pyramix, Nuendo and Reaper is quite highly developed. Session parameters like resolution, frame rate and transfer folders are automatically transmitted and do not require any further attention. Communication between the applications enables direct (i.e. spot-to-timeline) transfers into the editing system - given that the target application is capable of communicating this way. So if you are still working with an unsupported application like [ add your own garbage brand ], it is about time you switch editing systems!
3. ReWire
The ReWire software makes it possible to monitor directly through the editing system and the hardware. This is of special importance when using Pro Tools, as Pro Tools does not like to share its hardware at all.
ReWire allows you to monitor sound material directly from Soundminer - through the same hardware and set-up.
ReWire supports multi-channel audio formats - from LCR to 7.1
3.1. How to activate ReWire for stereo tracks
Before we can send audio files to your editing system, we need to set it up to receive ReWire. As a first step, please quit Soundminer and set up your editing system according to these instructions (in order to use ReWire, the software that is receiving ReWire must be opened first).
- Start DAW (DAW means your editing system ☺)
- Create 1 Stereo Aux Input
- Embed plugin into the Aux channel: Multi-channel Plugin / Instrument / SM Engine
(for Soundminer HD Plus: Multi-channel Plugin / Instrument / Soundminer HD ) - In the Plugin SM-Engine 4.0: select ReWire stream: SM-L, SM-R
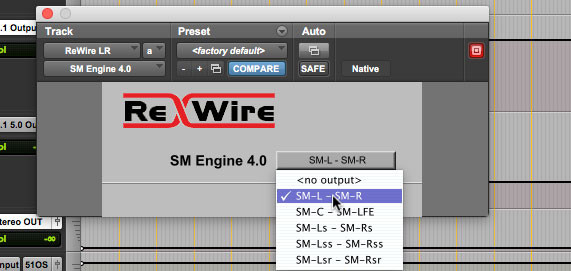
- Start Soundminer V4.5 Pro or HD Plus now: the ReWire symbol in the lower left corner of the window is glowing red (activated). Any sound material now played back in Soundminer will be transmitted through the ReWire connection to the editing system, using its proprietary hardware and routing.

3.2. How to activate ReWire for 5.1 and 7.1 playback
Before Soundminer is capable of streaming audio files via ReWire, you need to set up your editing system to receive signals via ReWire. As a first step, please quit Soundminer and set up your editing system according to these instructions (in order to use ReWire, the software that is receiving ReWire must be opened first).
- Start DAW (Yes, DAW means your editing system ☺)
- Create 3 Stereo Aux Inputs for 5.1 or 4 Stereo Aux if you work with 7.1
- Embed plugin into the Aux channel: Multi-channel Plugin / Instrument / SM Engine/
- In the Plugin SM-Engine 4.0: select ReWire Stream:
SM-L, SM-R for L/R
SM-C, SM-LFE for Center and LFE
SM-Ls, SM-Rs for Rears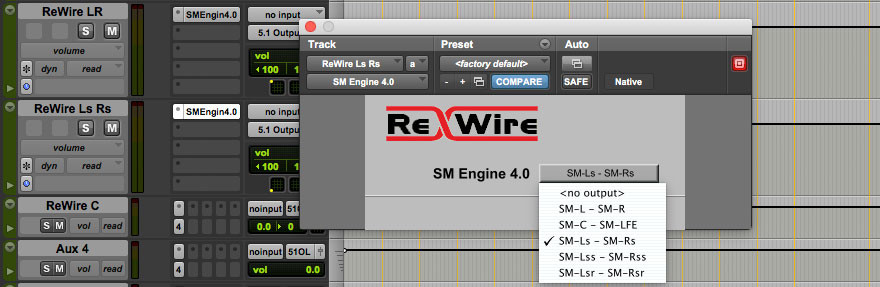
- For Dolby 7.1:
SM-Lss, SM-Rss for Side Surround
SM-Lrs, SM-Rsr for Side Rear - Channel Routing: This will now be done by your editing system! Please make sure to route the outputs of the Aux channels to the outputs of your editing system (just as with any other internal audio channel).
- Start Soundminer V4.5 Pro or HD Plus: if the ReWire symbol in the lower left corner of the window is red, ReWire is activated.

Any sound material now played back in Soundminer will be transmitted through the ReWire connection to the editing system, using its proprietary hardware and routing.
3.3. How to Quit / Pause ReWire

Click onto the ReWire symbol to suspend the ReWire connection and use your computer's standard playback engine instead.
4. Search Lock [cmd L]

The lock symbol in the Soundminer tool bar allows you to continue your search after a number of results.
If you've been searching for ‘door', for example, the lock button [cmd L] will enable you to search all the ‘door' results exclusively. So if you press the lock and search for 'metal', all metal doors will pop up in the results.
The BACK button allows you to return to your last search.
Searching with the lock function is an additive process. 'Door Metal' or 'Door+Metal' will yield the same result. Despite that, the search lock is quite useful when you are not quite sure what exactly you're looking for.
5. Freelance Mode (only Soundminer V4.5 Pro)
As the name implies, the Freelance Mode is aimed at people who often have to switch work places. The Freelance Mode allows you to save the Soundminer databases in the sound sections on an external hard drive. If you connect the drive(s) to anther Soundminer suite and open up Soundminer, the software will use the databases on the hard drive(s) rather than the local databases.
5.1 Freelance Mode - How it works
- Create a new folder on the external drive and label it Soundminer Support. The folder has to be at the top of the drive's directory and not in a sub-folder!
- Done
Soundminer will automatically access the folder called Soundminer Support when it is started up and will store all the new databases and settings in this folder.
5.2 Freelance Mode - Copying existing databases
Existing databases can simply be copied onto the external drive:
Local databases can be found under: [USER]/library/application support/soundminer/
A database consists of four files with the same name. Copy these four files into the Soundminer Support folder and the database will be available in Freelance Mode once you re-start your system.
To find out how to make the /Library folder visible in Mac OS, please click here.
6. Shortcuts
Shortcuts speed up your work process. Use them whenever possible. Click here to see an overview of the Soundminer shortcuts.
7. Edit Mode
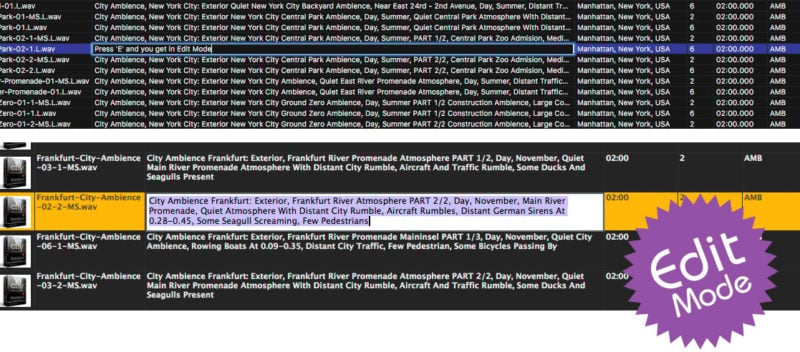
This trick is simple and easily explained: pressing [E] on your keyboard will switch the table field into Edit Mode. Simply move the cursor over the table field of a selected track.
Now you can write directly into the field and change text. But don't forget to embed the metadata changes so that they will be saved in the audio file.
8. Embed Selected Records
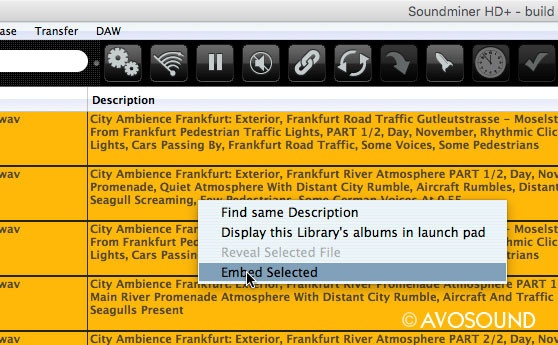
Save metadata with Soundminer HD Plus: How to save Metadata with Soundminer HD Plus: The Embed Selected command (right click on your mouse) will write the data from the HD Plus browser into the audio file.
Embedding means writing metadata into the audio file. All metadata is then saved with the audio file and will be available when you give the file to someone else.
Anyone who can open and read the audio file can also access the metadata.
8.1. Important to note: Metadata Changes
Write metadata with Soundminer V4.5 Pro
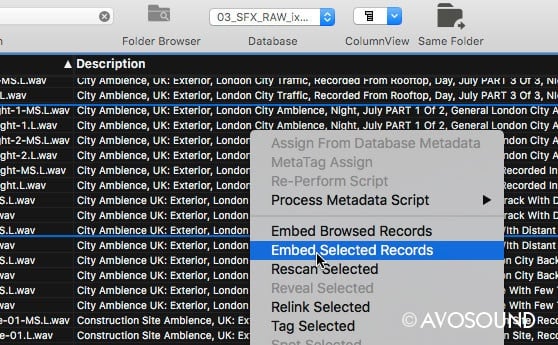
Changes to the metadata in Soundminer affect the text information only in the database. The changes must be written into the audio file as well - or they won't become active. In the database menu, the command 'Show Dirty Records' displays all changes that were not embedded in the audio file.
You will find the command 'Embed Selected Records' in the pop-up menu when you press the right mouse button. Select a track, Embed Selected Records - done.
9. Soundminer Server for Teams
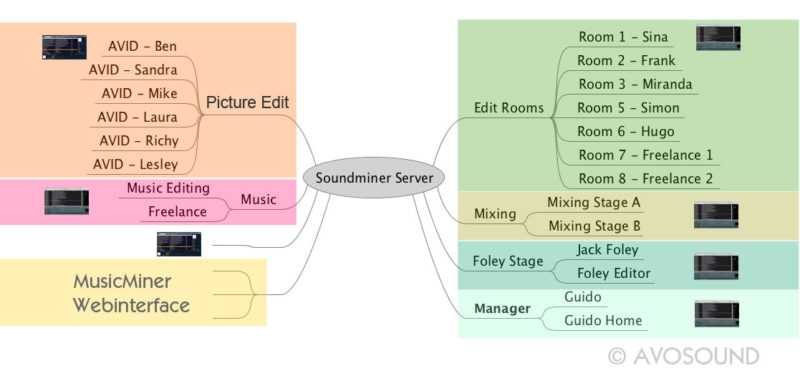
Soundminer is network-capable. This allows you to create a centralised database and make any changes and updates immediately available to all clients - a massive advantage.
9.1. How to manage server rights in Soundminer
As soon as you have several users accessing your network, you will need to assign certain rights to them - or, alternatively, revoke those rights again.
Soundminer V4.5 Pro allows you to set up user circles for various databases. You can then assign specific rights to these user circles. Any database that is not assigned to a user circle will not be visible to the group.
9.2. Admins and group admins
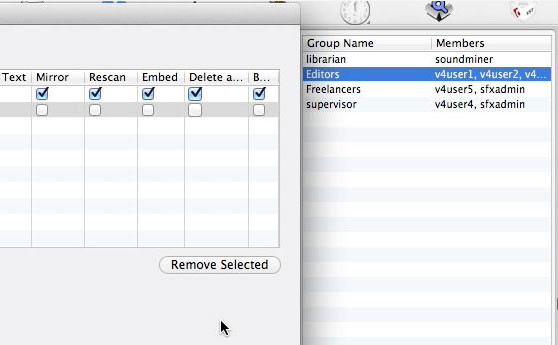
Larger networks might require a group administrator for individual user circles. Said administrator can take care of general database maintenance, make changes, import or remove sounds.
Creating and managing users and group circles is done via the Soundminer server and Soundminer V4.5 Pro.
9.3. Soundminer Server and HD Plus
In a Soundminer network, you can easily access the centralized server database with Soundminer HD Plus for Windows and Mac. The Musicminer web interface too can access the centralized Soundminer databases, allowing you to manage all your sounds and music from one server.
10. Renaming Databases
There is no specific command to rename databases in Soundminer. Simply because databases cannot be renamed. You have to copy them, save them under a new name and delete the old ones. This way it will look like you renamed them.
This trick allows you to rename databases:
- Close Soundminer
- Go to the folder [USER]/library/application support/soundminer/ Read here how to access the Library Folder when it is not visible
- In this folder Soundminer puts all its system data. A database consists of four files. These four files can now be renamed. All four files need to have the EXACT same name, or the renaming will not work.
11. Transfers explained
There are basically two kinds of transfers:
- Soundminer itself executes the transfer
- The target application takes care of the transfer
11.1. Soundminer Executes The Transfer
If you work with a Soundminer-supported, industry-standard editing system like Pro Tools, Pyramix or Nuendo, we recommend using one of Soundminer's proprietary transfer functions (e.g. Spot To Timeline or Bring Into) and let Soundminer handle the transfer.
The reason being that Soundminer was developed to handle this task correctly and with all necessary metadata intact.
So make sure to use the Spot To Timeline [S] or the Bring Into functions when you are transferring multiple files. No need to look at any alternative transfer functions, really (unless you want to risk losing your metadata or botching up the conversion).
11.2. What if my editing system does not support Soundminer?
If you are reading this, then you are probably using a sound or picture editing system that does not offer Soundminer support. Apart from switching to a [ add your choice of industry-standard brands ] edit system, there are alternatives out there for you.
And you can always contact the manufacturer of your edit system and ask them to offer Soundminer support.
11.3. Drag Transfer
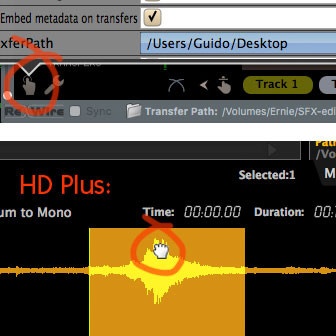
The Drag Transfer button is in the lower left corner of the Soundminer player and enables Soundminer to execute transfers. Make sure to check for compatibility, though, as this depends on your application.
The Drag Transfer has its own Transfer Setting window that allows you to set the many parameters of the transfer. Once it has been set up, you can select the audio material. You can load it by pressing down the mouse button and moving it over the Drag Transfer finger symbol (the radar player will give you a progress report). When the sound material has been loaded, it can be stored in a target application, on the desktop or in a folder.
11.4. Tip: Drag Transfer and Software Sampler
Drag Transfer supports various software samplers. Try out Drag Transfer at work with a sampler application like iZotope Iris or similar products.
11.5. Tips for working with AVID Media Composer
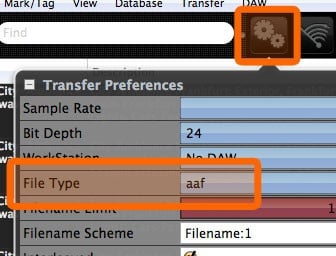
If you are using the sound format AAF as a transfer format, Soundminer is capable of transmitting all metadata as well as the sound material in AAF format to Media Composer.
The metadata will stay attached to the files even if the Media Composer session is later moved to Pro Tools.
11.6. Drag And Drop
You can Drag and Drop files from the Soundminer browser. Check if your edit system will accept the drops, though. Even if it does, metadata will most likely be lost (because the transfer is not executed through Soundminer).
11.7. Send To DAW
Check if your edit system appears in the DAW menu. If it does, you can use the function Send To DAW. As we no longer encourage people to use the Send To DAW function, it is deactivated by default and needs to be activated with the Customize Toolbar function.
Transferring files successfully with the Send To DAW function is heavily dependent on the software you use. Please run the necessary tests with your system.
Thanks for reading! Let us know your favorite Soundminer tips in the comments.